Blog about Maya, Realflow, Vue, Mentalray, Cryengine 3, ZBrush, Cryengine, Blender, Gimp and XNA
Saturday, February 9, 2013
Adding vinyls to car paint material
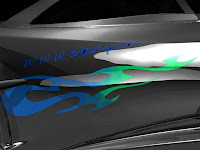
Adding vinyls to car model is very easy when you are using Maya stock materials like blinn. You can use alpha maps directly through transparent attribute of the material. But when you go to mi car paint material you have to use layered shader and surface shader. Before go through this tutorial you have to create a vinyl texture and and alpha map because I'm not going to show it here.
In here I'm going to add vinyls only for door part. If you are planing to customize all parts of the car you have to get clear uvs of the car. Go to uv texture editor and take a uv snapshot (Polygons->UV Snapshot...). Go to photoshop and open it. This is my snapshot.
Fill the background image with black color(not necessary). Then copy and and paste your vinyl texture. Go to Layer->Flatten Image. This is my background layer with texture.
This is my alpha mask. If you don't know how to create a alpha mask, simply copy and paste background image to alpha layer and increase the alpha value.
Now save the project in TGA format. Go to Maya and open Hypershade. Create a Layered Shader and assign to object. Create a 2d file node, blinn, surface shader and a mi car paint material. You can copy and paste your previous car paint attributes if you like. We are going to use blinn material for vinyl attributes like reflection, ambient color etc. You can use any material for this.
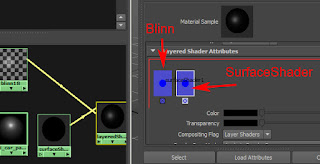
Go to attributes editor of the layered shader. You can see a default green color layer. Drag and drop blinn material to empty space of the attributes editor using middle mouse button. It will create a another layer.
We don't need the green layer so delete it by clicking small x box button under layer icon. Then drag and drop surface shader to empty space of the attributes editor using middle mouse button. Now you have two layers. One for blinn and one for surface shader.
Now you have to made the connection between surface shader and the mi car paint material. Simply drag and drop car paint material to surface shader using middle mouse button. Choose Default when pop-up menu comes. It will open connection editor. Click on result in left side and outColor in right side. Now your connection has been made.
Increase Ambient Color and the diffuse of the blinn material. Render your scene. If you have any question post it as a comment.
Subscribe to:
Post Comments (Atom)


No comments:
Post a Comment