Blog about Maya, Realflow, Vue, Mentalray, Cryengine 3, ZBrush, Cryengine, Blender, Gimp and XNA
Tuesday, December 10, 2013
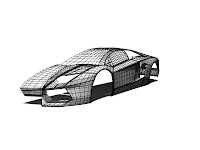
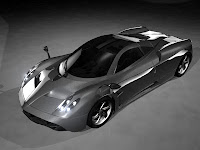
Making of LaFerrari in Maya
This is the walkthrough of my latest car modeling project. In here I'm going to focus on how I model the car body, except interior and other small parts.
Wednesday, October 9, 2013
Creating Light rays(god rays) using Maya and Mentalray
Using mental ray nodes to create volumetric fog is very easy but very tricky when you are dealing with scene scale. Let's start with the polygon cube.
Sunday, October 6, 2013
Making of an exterior scene in Maya
This is the walkthrough of my exterior scene project. I'm going to talk about some techniques and methods which I used to create this project.
Saturday, September 28, 2013
Rendering an interior scene in Mentalray
In this tutorial I'm going to talk about how to render an interior scene in Maya and mentalray using an area light. Also this method can be use in Maya 2013 or older version but you have to careful with the mentalray settings. In here I'm going to use Legacy Sampling method without any mentalray lights and nodes.
Wednesday, August 14, 2013
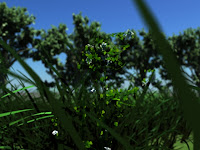
Rendering Maya plants in Mentalray
In this post I'm going to show you how to render plants in mentalray using mental ray materials. Also you can use this method for trees as well as grasses.
Saturday, August 3, 2013
Duplicating and placing 3D models in XNA
In this post I'm going to talk about duplicating 3d models several times using for loop. To duplicate 3d models, you have to import a 3d model to visual studio xna gaming platform. After importing the model you have to do the basic coding of the model and the camera which I explained in my previous post.
Friday, August 2, 2013
How to import a 3D object from Maya or 3DMax to XNA
First, export the object in FBX file format in Maya or 3DMax. Create a new visual studio project. Then add the fbx file to your visual studio project content folder. You can use add->existing item or just copy and paste the file. Then add a new variable to render this model.
Monday, July 29, 2013
Draw primitives in XNA
Best way to draw a primitive on the screen is declare an array of vertices and pass those to the DrawUserPrimitive method. Now lets see how to do it. First you need to create an instance of BasicEffect.
Saturday, June 22, 2013
AI vehicle movement in cryengine 3
Normally you can move your AI vehicle using AI follow path, but you can't control the speed of the vehicle. Using vehicle follow path you can control the speed and you can reverse the vehicle.
Wednesday, June 19, 2013
Creating a custom weapon for Cryengine3 using Maya
Sunday, June 9, 2013
Creating a custom first person arms in Maya for Cryengine 3
In this tutorial you are going to learn how to create custom arms for Cryengine3 in Maya. Actually I'm going to talk about how to export custom arms to Cryengine3. There are lot of tutorials which explain 3dmax and crengine3 integration. But I'm heavy Maya user, so I think this might be very helpful for Maya users.
Saturday, June 8, 2013
Importing objects as separate parts and unwrap UVs in zbrush
When you import objects from Maya or 3d Max to Zbrush it will import as a single mesh. After importing a object you can separate it's part using Group Split method. Now lets see how to unwrap the UVs and separate the parts.
Tuesday, April 16, 2013
Rendering with wireframe in Maya
In 3D industry, 3D model designers rendered their model with the wire frame for the presentation or behind scene of the movie, so audience can see the topology of the model while looking at the detail of the model. If you are using Maya for the 3D modeling and animation you can use contours rendering in mental ray. Now lets see how to render your scene with wire frame.
Saturday, March 23, 2013
Maya facial animation using Zbrush
In this post I'm going to show you how to create a facial animation using Maya and Zbrush. You can do a facial animation using joints but this method is very useful when you going to do very smooth and sharp animation. In here I'm going to do small smile animation.
Sunday, February 10, 2013
How to handle dielectric material
You can create dielectric material and assign it to object, but it is not the correct way. You cannot handle special attributes like photons. Because of this we have to use Maya default material. In this post I'm going to show you how to do it.
Saturday, February 9, 2013
Creating topology in zbrush
When you are creating a game character you have to make it low poly. If your game character is high poly it may cause some problems when you are importing it to the game engine. Using zbrush topology tool you can create low poly model according to the actual high poly model.
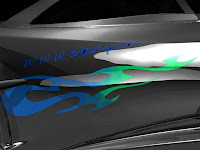
Adding vinyls to car paint material
Adding vinyls to car model is very easy when you are using Maya stock materials like blinn. You can use alpha maps directly through transparent attribute of the material. But when you go to mi car paint material you have to use layered shader and surface shader. Before go through this tutorial you have to create a vinyl texture and and alpha map because I'm not going to show it here.
Wall/Glass destruction using DMM in Maya
In this post I'm going to show you how to destruction wall/glass using dmm plugin. In my previous post I talked about some destruction methods using nDynamics but this also good for smashing objects.
Car dust
First open your scene and set rendering method as mental ray. Otherwise you cannot render it clearly because we use mental ray car paint material. Make sure that you have already load mental ray plugin.
Text animation with destruction
In this tutorial I'm going to show you how to create a text animation using nDynamics in Autodesk Maya. In here we use text destruction method for text animation. Most text destruction animations are used in a game or movie or company logos.
Particle Streaks
In this post I'm going to show you how to create particle streaks. You can use this method in sci-fi or mystery movie animations. In here we are going to use nparticles, not particles.
How to render animations in Maya
Changing the playback speed in Maya
Playback speed is the most important thing when you are designing a real time animation with sound. Now lets see how to change it.
Go to Window->Settings/Preference->Preference or click on the red blue icon on the range slider panel.
Car paint material
When you are rendering a car with default mi_car_paint material you can see little noisy scratches on your car body. You have to do some little modification. In this post I will discuss about the mi_car_paint material.
First create the material and assign it to your car. Go to attributes editor and set the Base Color and Lit Color. These two colors must be little bit different. Increase Lit Color Bias little bit if you want. Increase Diffuse Bias to 2.000. Set edge color to dark grey.
Scroll down and expand Specular Parameters. Set color to a light red(depends on your base color). Set weight to 0.5 and Spec Exp to 80.0.
Then we have to modify Flake Parameters. Set flake color to light grey.
Flake Weight-1.2
Flake Reflect-0.05
Flake Exp-120
Flake Density-0.3(increase this parameter if you want)
Flake Strength-0.8
Flake Scale-0.01(this value depends on your car scale)
You can see the material is more realistic than previous. No need to change any reflection parameters. If you are going to render your car on exterior scene, change the reflection parameters of your choice.
Adding materials and plants to vue scene
In my previous post I talked about how to create a desert landscape using Vue. You can go to my previous post by clicking here.
Desert landscape for Maya
In my previous post I discuss about how to integrate Vue with Maya. If you didn't read it, go to my previous post by clicking here. Now lets see how to create a simple terrain.
Friday, February 8, 2013
Landscape modeling for Maya
You can model simple landscapes using sculpt surface tool on nurbs surfaces. Think you have to sculpt some surface effects like erosion, rocks, dunes etc. When you are modeling hard surfaces like that you have to move to external softwares like modbox, zbrush etc. But in this post I will discuss about Vue which is very useful for modeling landscapes.
Realflow pouring water
Real flow is the most popular fluid and dynamic simulator in 3D industry. You can create simple to complex dynamic simulation in Realflow. Download Realflow by clicking here.
To integrate Maya and Realflow you have to download Realflow Maya plugin by clicking here. After installing the plugin go to Window->Settings/Preferences->Plug-in Manager and put a tic in front of realflow.mll. Now you can see Realflow tab in Maya shelf.
Car smoke trail
In this post I'm going to show you how to create a car smoke trail. In here we are going to use particles, not nparticles. Most people use nparticles for their car animations but I think particles method is also important. hope you guys enjoy it.
Thursday, February 7, 2013
Rendering substance in mentalray
First you need to download substance bonus tools. Click here to download it. Make sure to choose correct version. After you download you can read the user guide that includes how to install the package. If you install correctly, you can see a new tab in Maya shelf.
Road texture in Maya 2012 substance
Maya 2012 comes with new function called substance. You can create realistic seamless procedural textures using substance. Substance only available for Maya 2012 and up.
Before begin you have to create road with correct uv mapping. In here I use simple polygon plane and extrude 30 times along a curve.
Tuesday, February 5, 2013
Car rendering using Maya and HDR light studio
In this post I'm going to show you car rendering and lighting techniques which is very useful for studio background renderings. In here we use special software called HDR Lighting Studio. You can download it by clicking here.
Creating a table cloth using nDynamics
In this tutorial you can learn how to create table cloth and material using nDynamics. You can model the cloth using nurbs surfaces but it is hard. When we use nDynamics it is automatically calculate the shape of the cloth, no need to model it.
Monday, February 4, 2013
Depth of field
In this post I'm going to show you how to add depth for camera which is known as camera blur. You can do it on Autodesk Composite but I think this method is also good. Hope you guys enjoy it.
Photoshop displacement maps to Maya
Using a displacement maps in Autodesk Maya is very useful for closeup ground animation. You can use normal mapping or bump mapping but they are not highly detailed methods. In this tutorial you will learn how to create a custom displacement map in photoshop and import it in to Maya.
Sunset scene
In my previous post I talked about how to create a clouds using Maya fluid effects. You can view it by clicking here. In this post I'm going to show you how to create sunset scene using Maya physical sun and sky. This method is very useful for closeup cloud sunset scenes.
Maya fluid effect clouds
In my previous post I have explained some methods to create clouds using textures. It is very simple and quick method but it is not suitable for most animation like Aircraft animation on clouds. If you are using this kind of animation you have to create realistic clouds. In this post I will explain a method to create a realistic cloud using Autodesk Maya fluid effects.
Sunday, February 3, 2013
Maya car animation using craft director studio
In this post I'm going to show you how to create a Maya car animation using craft directer studio. Simply you can animate your car using arrow keys but you can also use Autonomous Mode which is very useful for motion path animation
Sky and cloud texture for Maya software render
This is a very useful method that you can use in Autodesk Maya software rendering. Using fluid effects to generate cloud is little bit advance and take much time to render. But using a camera attached texture is a very simple. It takes few seconds to render. Also you can use this method in mental ray rendering. But there are other ways to design more realistic sky and clouds in mental ray.
Rotating object using mel script
Adding Mel Script to your object is easy way to animate it. Go through the Maya documentation and you can learn it easily. Now lets see how to rotate your object using Mel Script.
Maya Underwater scene
In this tutorial you will learn how to design an underwater scene using Autodesk Maya Environment fog(note that you can use this method in mental ray after creating the environment fog). You can design this using Realflow or Maya Fluid effects. But it gets much time to render. Using environment fog is very simple and very easy. This method is very usefull for underwater submarine animation.
Subscribe to:
Comments (Atom)


